• Home
  • Hacking & Security
    • Network Hacking
    • Web Hacking
    • Social Engineering
    • Kali Linux
    Submit An Article
  • Courses
    • All Courses
    • Bundles
    • Masterclass
    • VIP Membership
    • FAQ

    Popular Courses

  • Shop
    • Hardware Bundles
    • Wireless Adapters
    • Pentesting Tools
    • Security
    • Accessories
    • Clothing
    • Books
    • All
  • Competition
  • Services
    Penetration Testing
    Consulting
    Code Review
    One on one Training
    Online Courses
    VPN
  • Blog
      • Cart

    VIP Membership Masterclass
    Got a question?
    [email protected]
    RegisterLogin
    zSecurity
    • Home
    • Hacking & Security
      • Network Hacking
      • Web Hacking
      • Social Engineering
      • Kali Linux
      Submit An Article
    • Courses
      • All Courses
      • Bundles
      • Masterclass
      • VIP Membership
      • FAQ

      Popular Courses

    • Shop
      • Hardware Bundles
      • Wireless Adapters
      • Pentesting Tools
      • Security
      • Accessories
      • Clothing
      • Books
      • All
    • Competition
    • Services
      Penetration Testing
      Consulting
      Code Review
      One on one Training
      Online Courses
      VPN
    • Blog
        • Cart

      Hacking & Security

      Automated Response With Alien Vault Alerts

      • Posted by m.laroshkhan
      • Date August 21, 2019

      AlienVault OSSIM generates various alarms, it’s possible that the analyst would miss some of the alarms that could have a devastating impact on our infrastructure. To cater for this scenario, we developed a system for automated response to ensure that alarms against our critical systems are dealt with promptly and effectively.

      AlienVault Configuration

      We configured AlienVault (SIEM – OSSIM) for continuous monitoring of our internal network and connected devices. AlienVault is fully operational and generates alarms based on the directives/rules that we have created and customised according to our needs.

      AlienVault allows us to create custom policies and allows the administrator to trigger one or more of the following actions against those policies:

      1. Open a ticket.
      2. Send an email.
      3. Run scripts

      As we have various policies that require different actions, we opted for the third option of running custom scripts to ensure that the policy serves its purposed in an efficient manner.

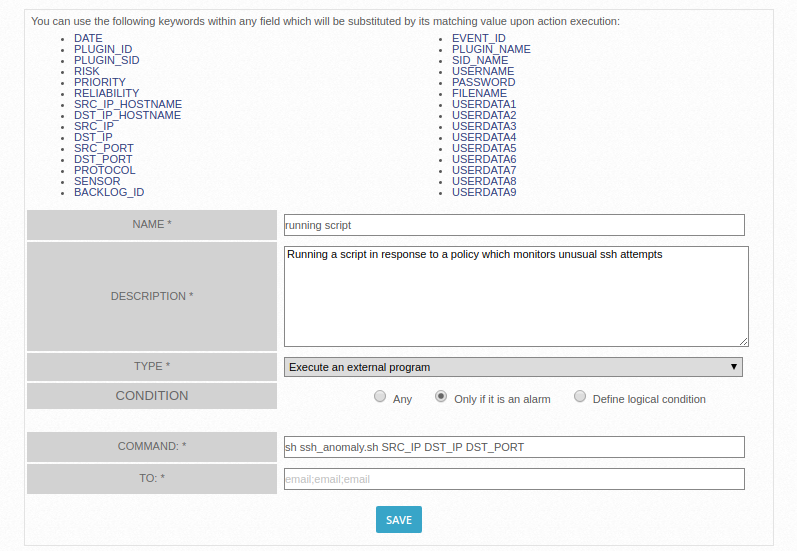
      By default, AlienVault executes a script from its root directory, so we placed our script in the root director, we can pass along all the above-mentioned keywords as parameters for the script.It is important to know if you want to have the script in a directory other than root, you need to set the path relative to the root directory. This information is not present in the official AlienVault documentation and it can cause errors. In our case, we passed SRC_IP, DST_IP and DST_PORT as arguments for our script.

      Automation architecture diagram
      Automation architecture diagram


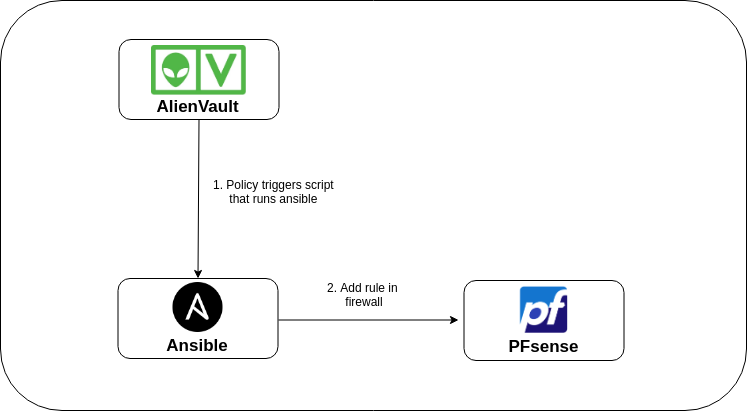
      The above figure shows different components of our automated response system.

      To get a better understanding of this architecture let us consider a scenario.

      Scenario

      Lets say we have a server with SSH. This server is added in our AlienVault as one of the assets and hence it is being monitored 24/7. We have written a directive in our AlienVault which triggers an alarm whenever three or more failed login attempts occur on the server. There is a policy defined in AlienVault that gets triggered based on this directive. As mentioned earlier, policies can have various responses. In this case, we will be executing a custom script that will block the IP from which the server has received the failed login attempts by adding the rules in PFSense Firewall by the help of Ansible server and its Playbook. This response will ensure that the adversary attacking our system gets blocked and hence securing our server.

      AlienVault OSSIM is an open-source security information and event management system, integrating a selection of tools designed to aid network administrators in computer security, intrusion detection and prevention.

      Ansible is an open-source automation tool, or platform, used for IT tasks such as configuration management, application deployment, intraservice orchestration and provisioning.

      pfSense is a free and open-source firewall and router that also features unified threat management, load balancing, multi WAN, and more[ii]

      AlienVault triggers a script in response to policies which then calls ansible server and add a rule in PFsense [iii]

      Internal working of the system

      ssh_anomaly.sh

      The first script which in AlienVault that gets triggered in response to policy action is ssh_anomaly.sh, this script takes source IP, destination IP and destination port as parameters and calls Ansible server.

      #!/bin/bash
      
      ## GET Params from AlienVault
      
      source_ip=$1
      
      destination_ip=$2
      
      destination_port=$3
      
      ## These are the params of PFsense firewall and can be provided with default value or change according to need
      
      interface="wan"
      
      type='block'
      
      ipproto='inet'
      
      description="blocked for ssh anomaly"
      
      ## add ssh password of server where ansible-playbook will be executed
      
      export SSHPASS="YOUR_ANSIBLE_PASS"
      
      ## Execute script on remote server which will execute ansible-playbook with given params
      
      sshpass -e ssh [email protected]_IP "sh YOUR_SCRIPT_PATH_ON_ANSIBLE_SERVER/add_rule.sh $source_ip $destination_ip $destination_port $interface $type $ipproto $description"


      Add_rule.sh

      This is the script that gets triggered from AlienVault and passes along the parameters needed for firewall rule to Ansible-Playbook

      #!/bin/sh
      
      # Params will be received from another server via ssh call (from AlienVault)
      
      source_ip=$1
      
      destination_ip=$2
      
      destination_port=$3
      
      interface=$4
      
      type=$5
      
      ipproto=$6
      
      description=$7
      
      MY_PID=$$
      
      # Ansible ping
      
      ansible -i INVENTORY_PATH/inventory -m ping myhosts
      
      # Execute ansible-playbook with given params to add a rule in firewall
      
      # Executes playbook.yml
      
      ansible-playbook -i INVENTORY_PATH/inventory PLAYBOOK_PATH/playbook.yml --user=ANSIBLE_USER --extra-vars "ansible_sudo_pass=ANSIBLE_PASSWORD" --extra-var type="$type" --extra-var ipproto="$ipproto" --extra-var description="$description" --extra-var sourceip="$source_ip" --extra-var destinationip="$destination_ip" --extra-var destinationport="$destination_port" --extra-var interface="$interface" --extra-var MY_PID="$MY_PID"


      Replace ANSIBLE_USER, ANSIBLE_PASSWORD, INVENTORY_PATH and PLAYBOOK_PATH with your own details.

      Ansible installation can be found in references [i]


      Playbook.yml

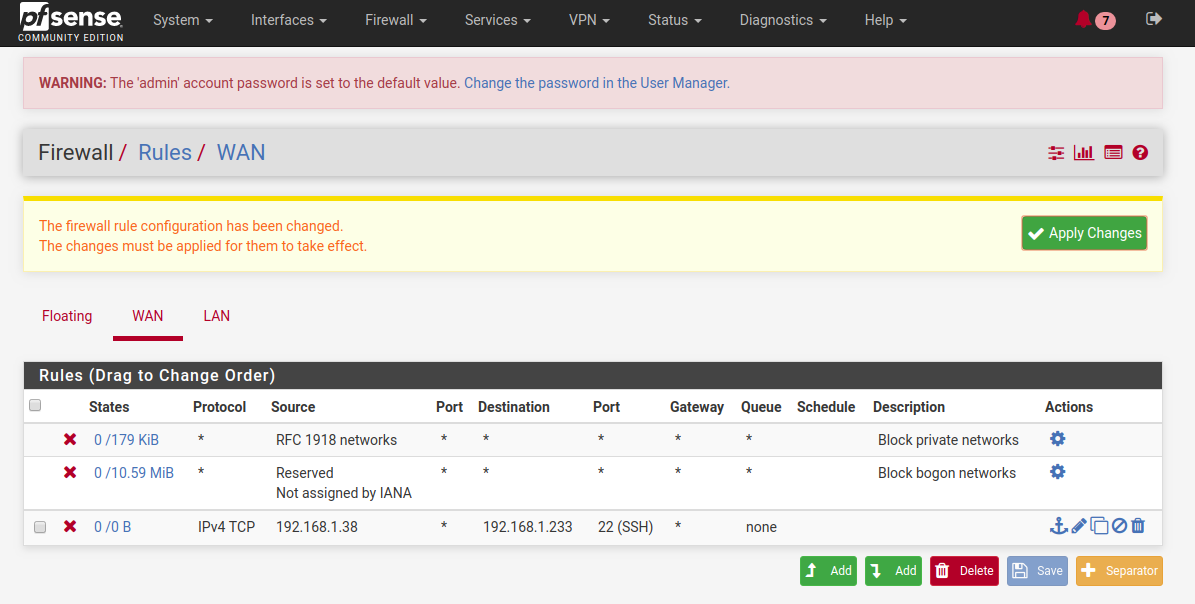
      This playbook edits the config file of pfSense in order to add/remove a firewall rule (blocking/unblocking a particular IP on specific port…etc). This script also handles errors by sending email reports to the admin in case of failure.

      ---
      
      - hosts: myhosts
      
      become: true
      
      become_user: root
      
      tasks:
      
      - name: 'edit config.xml'
      
      register: output
      
      ignore_errors: yes
      
      lineinfile:
      
      dest: "/cf/conf/config.xml"
      
      regexp: '{{ item.regexp }}'
      
      line: '{{ item.line }}'
      
      with_items:
      
      - { regexp: '(?<![wd])(?![wd])', line: "n{{ type }}{{ ipproto }}{{ description }}{{ interface }}123456789
      
      {{ sourceip }}
      
      {{ destinationip }}
      
      {{ destinationport }}" }
      
      - name: Sending an e-mail using Gmail SMTP servers
      
      mail:
      
      host: smtp.gmail.com
      
      port: 587
      
      username: "YOUR_EMAIL"
      
      password: "YOUR_PASS"
      
      to: RECEIVER_NAME
      
      subject: Ansible-report
      
      body: "Failed : {{ output.results[0].failed }}nChanged : {{ output.results[0].changed }}nMsg : {{ output.results[0].msg }}"
      
      delegate_to: localhost
      
      when: item.failed == True
      
      loop: "{{ output.results }}"
      
      - name: Kill bash script
      
      shell: sudo kill -9 {{ MY_PID }}
      
      when: item.failed == True
      
      loop: "{{ output.results }}"
      
      delegate_to: localhost
      
      - name: Reload Firewall rules
      
      shell: /etc/rc.filter_configure
      
      when: item.failed == False
      
      loop: "{{ output.results }}"
      
      
      Screenshot of rule added in the firewall
      Screenshot of rule added in the firewall

      Contributors : This article is a combined effort of me and my colleague Sikandar Iqbal


      References

      [i] https://docs.ansible.com/ansible/latest/installation_guide/intro_installation.html

      [ii] https://www.pfsense.org/download/

      [iii] https://www.alienvault.com/documentation/usm-appliance/policy-management/action-exec-ext.htm

      • Share:
      author avatar
      m.laroshkhan

      An Information Security enthusiast who actively wants to take part in making the cyberspace secure for everyone.

      Previous post

      Top 10 Ethical Hacking Tools in 2019
      August 21, 2019

      Next post

      How To Become a Hacker
      August 28, 2019

      You may also like

      domain-controllers_370x208
      Identifying Domain controller in a network
      24 March, 2023
      storm-braker_370x208
      Access Location, Camera & Mic of any Device πŸŒŽπŸŽ€πŸ“πŸ“·
      23 March, 2023
      Common-Authentication-Bypass-Techniques_370x208
      Common Authentication Bypass Techniques
      16 March, 2023

      Leave A Reply Cancel reply

      You must be logged in to post a comment.

      Categories

      • Cryptography
      • Cryptography
      • CTF
      • Forensics
      • Hacking & Security
      • Hardware
      • IOT
      • Kali Linux
      • Network Hacking
      • News
      • OSINT
      • Post Exploitation
      • Post Exploitation
      • Privacy
      • Programming
      • Security
      • Social Engineering
      • Uncategorized
      • Web Hacking

      Popular Posts

      Got a Blank Screen After Importing Kali in Virtual Box ? Here’s How To Fix It
      25Jan2018

      Connect with us

      • Facebook
      • Twitter
      • LinkedIn
      • Instagram
      • Youtube

      β€œEverything related to ethical hacking

      & cyber security in one place.”

      Quick Links

      • Home
      • About Us
      • Hacking & Security
      • Download Custom Kali
      • Contact
      • FAQ

      Services

      • Penetration Testing
      • Consulting
      • Code Review
      • One on one training
      • VPN
      • VIP Membership

      Company

      • About Us
      • Contact
      • Vulnerability Disclosure

      Support

      • FAQ
      • Forums

      Copyright Β© 2022 Z IT SECURITY LTD t/a zSecurity. All rights reserved.

      • Privacy
      • Shipping
      • Refunds
      • Terms

      Contribute

      Share your knowledge with the world

      SUBMIT AN ARTICLE

      Login with your site account

      Lost your password?

      Not a member yet? Register now

      Register a new account


      Are you a member? Login now

      Enroll in this course to access this lesson!

      All of our courses include:

      βœ” Lifetime, unlimited access to course materials & training videos.

      βœ” Watch online or download lectures for offline use.

      βœ” Verifiable certificate of completion from zSecurity, signed by the course instructor, Zaid.

      βœ” Get answers from our Support Team within a maximum of 15 hours.

      βœ” Unlimited Updates.

      Get free 1 month VIP membership per course with:

      βœ” Live mentorship and Q&A session with the course instructor, Zaid.

      βœ” Instant support from community members through our private discord channel.

      βœ” Daily updates with the latest tutorials & news in the hacking world.

      βœ” Daily resources like CTFs, bug bounty programs, onion services and more!

      βœ” Access our VIP community & connect with like-minded people.

      βœ” Discounts on other zSecurity products and services.

      We are using cookies to give you the best experience on our website. This includes but is not limited to:

      • Storing your settings and preferences.
      • Remember your access information
      • Track website performance and make our website more relevant to you.

      You can find out more about which cookies we are using or switch them off in settings.

      Privacy Overview

      This website uses cookies so that we can provide you with the best user experience possible. Cookie information is stored in your browser and performs functions such as recognising you when you return to our website and helping our team to understand which sections of the website you find most interesting and useful.

      Strictly Necessary Cookies

      Strictly Necessary Cookie should be enabled at all times so that we can save your preferences for cookie settings.

      3rd Party Cookies

      This website uses Google Analytics and Linkedin to collect anonymous information such as the number of visitors to the site, and the most popular pages.

      Keeping this cookies enabled helps us to improve our website.

      Please enable Strictly Necessary Cookies first so that we can save your preferences!

      Powered by  GDPR Cookie Compliance